More Boxes – Triangles
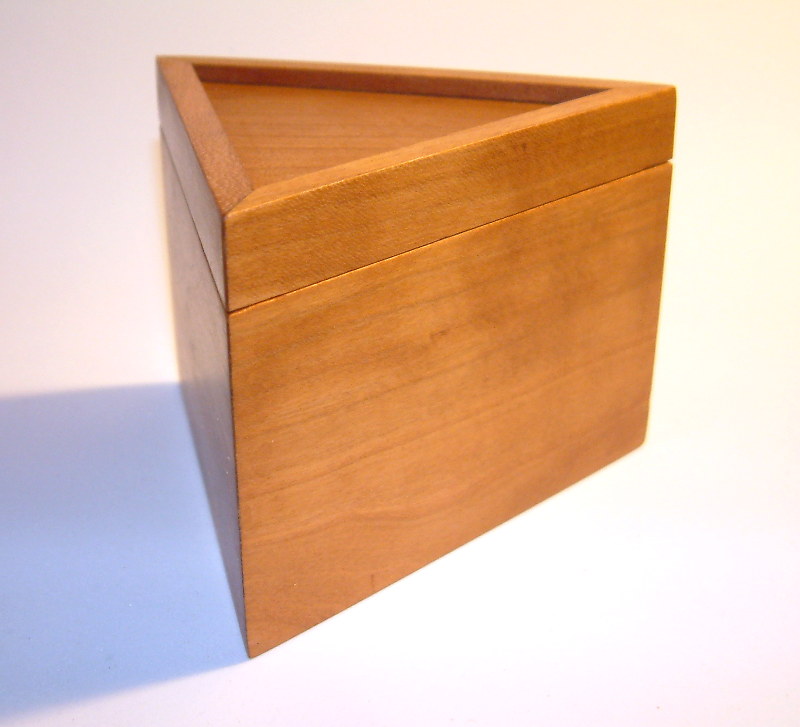

I’ve mastered the creation of Rectangular sliding lid boxes, and Hexagonal sliding lid boxes. What’s next? How about three sided boxes? Can’t do a sliding lid because there would be no parallel sides for the lid to slide in. I did a few lift off lid boxes last year and that might work for a triangular configuration.
I realized a triangular miter corner box would need miters cut to a 30 degree angle. This is a problem because the table saw blade will only tilt to 45 degrees. Some discussion on the Dupage Woodworkers forum uncovered two methods – tilt the blade 30 degrees from vertical and clamp the work piece vertically, the other method tilts the blade to 45 and shims up the work so the cut is at 30 degrees. The former method is used in making flag cases where the miters are at 22.5 degrees but I wanted to precisely control the width of the box sides which means using a stop of some kind and don’t see a way to implement a stop with the work sticking straight up.
So I chose the shim method. I have a cross cut sled built specifically for mitering 45 degree rectangular box corners, that could be modified for this purpose. I sawed a 16 degree ramp from a 2×8 and attached it to the sled. I quickly found my homemade flip stop T Tracked across the back fence wasn’t going to work. I used the cutoff from making the ramp to add a bit of T Track at the same angle as the ramp. The flip stop has to drop slightly below the ramp surface because the work is cut face down and the sharp arris would slide under the end. There’s a shallow rabbit to allow that to happen.

The ramp was made to 16 degrees to provide a small amount of blade tilt range so the cut can be tuned. It works well and later a DeStaCo style clamp was added to save fingers.
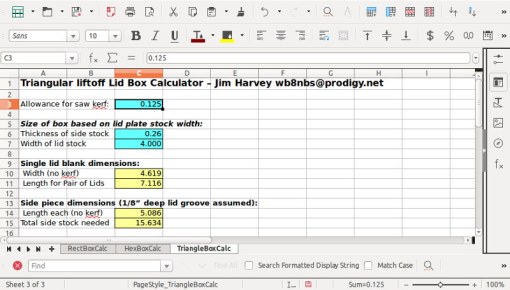
Calculations for sizing the components are not complicated, basically dividing the problem into a series of 30-60–90 triangles. I assumed the construction would be from a single board, though it is certainly possible to use a different board for the lids than for the sides.

It’s very important for the stock to have parallel edges and a uniform thickness. The critical measurements are the board width which determines the lid size, and the board thickness which along with width determines the length of each side. I made a spread sheet. A 1/8″ allowance for saw kerf works well for me, but I use a Diablo 7 1/4″ thin kerf blade that makes a cut only .066 wide. Your Mileage May Vary.
To make the sled work, you cut the side pieces square, then bevel them later. Dimension the side blanks 1/8″ longer than the sheet specifies to give a bit of leeway in the crosscut jig. I used my miter gauge with an aux fence and stop added to make these cuts.
Once the first side blank is dimensioned, it can be used to set the flip stop for the rest of the sides. Keep in mind you might be making many of these boxes so the stop setting can be used over and over.

The next set of cuts with the blade straight up is for making two lid blanks. I trust the 60 degree click stops on my miter gauge, and do this free hand after drawing an initial line on the board.


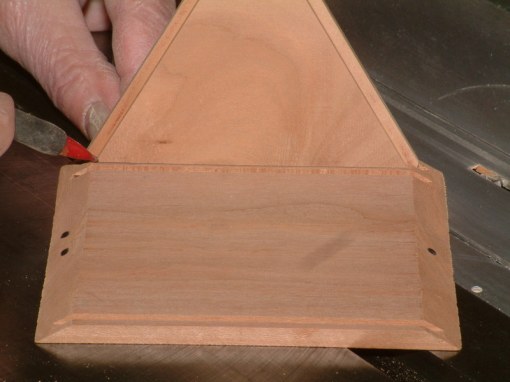
Five prepared pieces result ready for miters and rabbits.

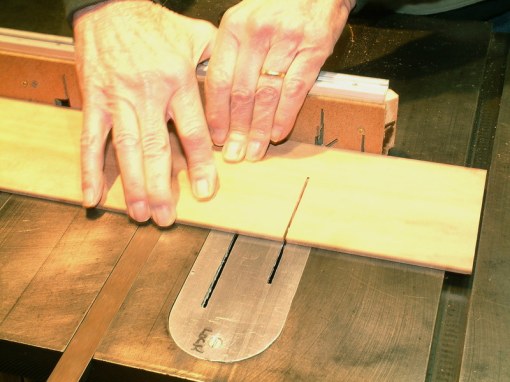
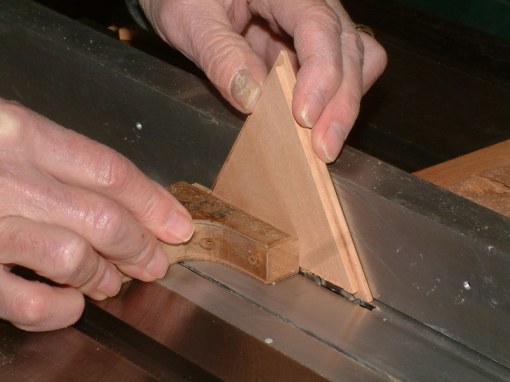
The next few steps cut the thirty degree miters on each side piece. I use a Wixey angle gauge to set the blade angle which as discussed above, works with the ramp to make the correct bevel. I found after considerable trial and error with my first box that a blade angle of 45.6 degrees is best for my sled. A tenth of a degree make a noticeable difference in how the box sides fit together so accuracy is important. I use the small square to ensure the Wixey is perpendicular to the table.

An initial bevel is cut on all side pieces with the flip stop raised. Here you can see the DeStaCo clamp I added in use.

Now mark one of the side pieces for the position of the second bevel. (5.086″ here from the spread sheet) Position the side piece on the sled, drop the flip stop, and sneak up to the mark by making thin cuts while moving the stop. Check the overall length.

It’s a good idea (though not necessary) to keep the side pieces in order so the grain flows nicely around the box. Lay the three sides down, align them, and use a marker to print dots on adjacent bevels. Those dots will come in real handy when you have glue applied to the bevels and have to quickly assemble the box. Also, this is a good point to decide and mark which edge will be the top.

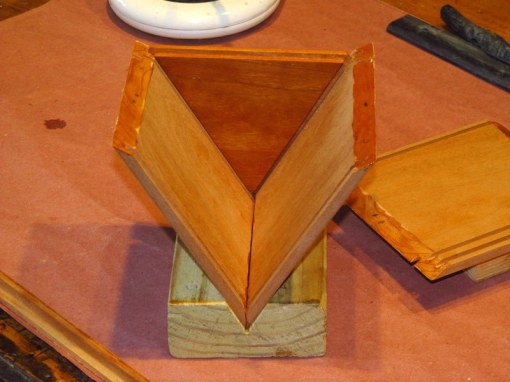
With all six bevels cut, you can dry fit the box and see how your angles worked out. It doesn’t get any better than this.

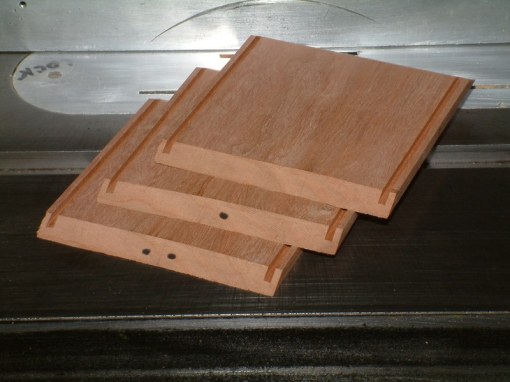
All the remaining milling is done with a 1/8″ wide blade with flat teeth. I use one of the side blades from my Freud Stacked Dado set. A wide ATB blade will work but not look as good on the finished box. Note here that it’s best to make the bevels first then do the grooves which minimizes tear out of the grooves.
The fat blade is swapped into the saw, a zero clearance insert installed and blade height set to 1/8″. The grooves for the lid plates in this project are assumed to be 1/8″ and that is built into the spread sheet. Practically though, I make the lid plate grooves a few thousandths deeper that 1/8″ to allow for wood movement.

Bring the saw fence up to 1/8″ from the blade and we are ready to cut grooves for the top and bottom lid plates in all three side pieces.

Note that one groove uses the top edge as reference, the second groove uses the bottom edge as reference. This is why it is important the stock has a uniform width.
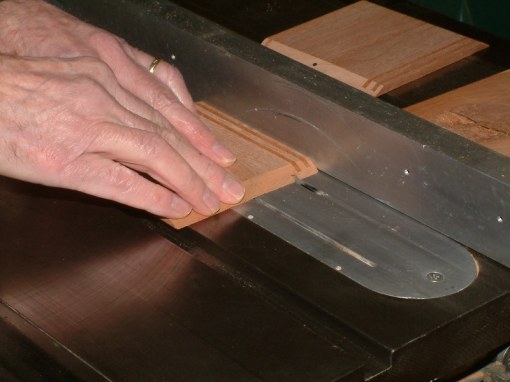
A similar blade set up is used to make the rabbits around the edge of each lid blank. The lid is held vertically against the fence, so the height of the blade sets the depth of the tenon, the distance between blade and fence sets the thickness. I always make two passes as the wood has a tendency to ride up over the blade.
Initially set the fence a little too far from the blade. This will allow sneaking up on the final tenon thickness. You want the lid to float, it should fit easily in the groove but without a lot of play. Once a good fit is found, run all the lid edges. Short grain edges first, long grain edge last will minimize tearout.
Make a small mark on one of the sides to indicate how far down the inside surface of the lid comes.

When the lids are fully rabbited, you can do a dry fit of all five components. Check that the miters can fully come together. If they don’t, it’s probably because the lid plate is a bit too big or the rabbit not deep enough. Fix with a shoulder plane or tweak the rabbit set up on the table saw.
The inside surface of the lid plate should have a small amount of clearance around the edge in case the wood expands. You can check this by dry fitting the lids one at a time or just set the lid in it’s groove. There should be a small space between the inside corner of the lid and the start of the groove.
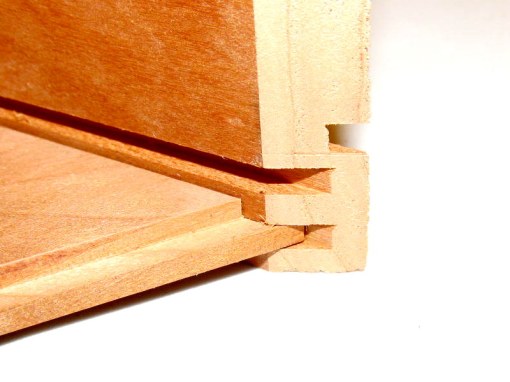
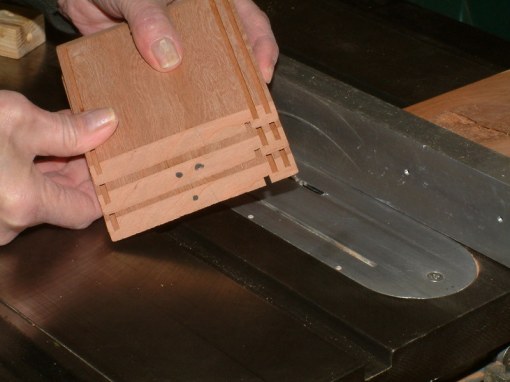
Now comes the interesting part, cutting the two grooves that will nest together after the box is glued up and cut open. This is an upside down detail of what it will look like. The lid plate fits in the groove at the bottom, the lip of the sawn off top is formed by the middle groove and the lip on the sides is formed by the top groove. The bottoms of those two grooves must meet precisely. Between middle and top grooves is a small bit of wood where the assembled box will be sawn open.
Measure from the top edge of a side to the previous mark that indicates how far down the inside of the lid comes.

Add about .020 to that measurement and set the saw fence to that dimension away from the blade. This will be the position of the groove that forms the lip on the sawn off lid.
Paying attention to which edge you previously selected as the top edge, cut the groove in all three pieces.

Now to position the final groove that will form the lip on the side pieces, set the calipers to the bottom edge of the lid lip groove plus the width of the blade you will be using to cut the box open plus .020″. Set the saw fence that distance from the blade.
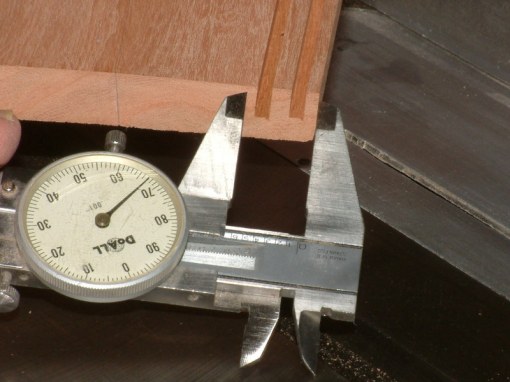
Carefully measure the distance from the bottom of the lid lip groove to the outside surface of the side piece. Set the saw blade height to that dimension. If all goes well, the inside of the next groove will coincide perfectly with the inside of the lid lip. It may be best to make this dimension a few thousandths short which will allow for fine tuning of the lid fit later with a shoulder plane.

Cut the final groove. Note this is on the OUTSIDE of the box, the side pieces are face down on the saw table.
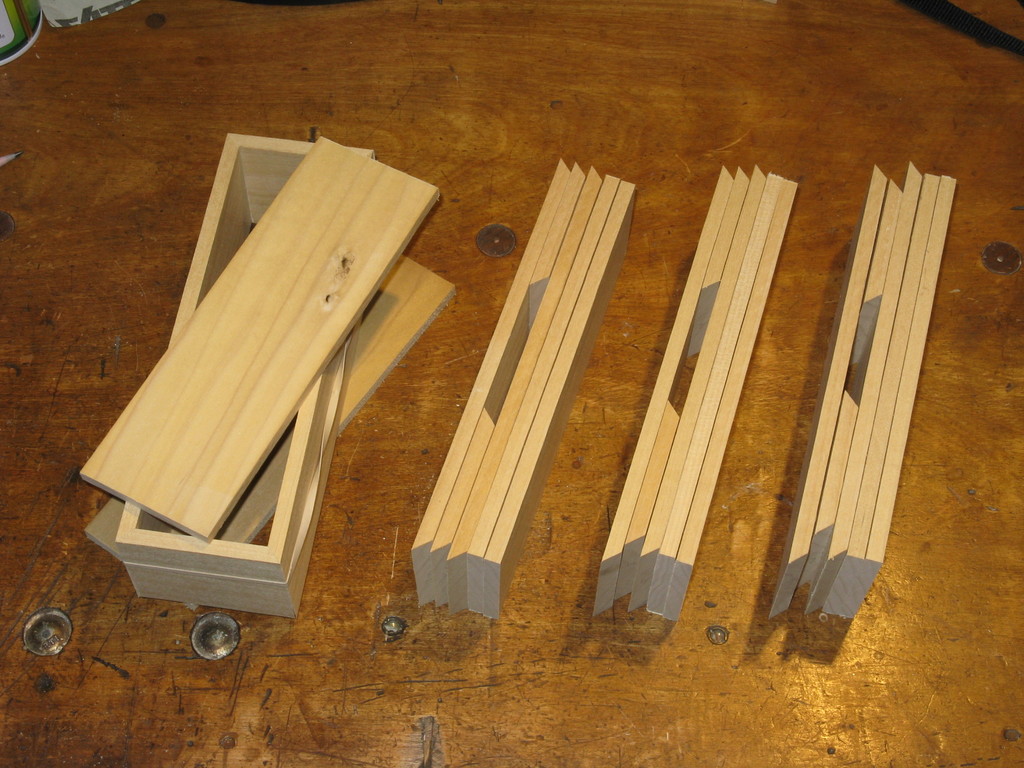
The stack of side plates are now completed ready for a glue up. You can do a final dry fit to check everything out.
The entire process outlined above including taking photos took about 3 hours. I did have all the jigs made and debugged but that’s an indication of how long it would take to make these in quantity.
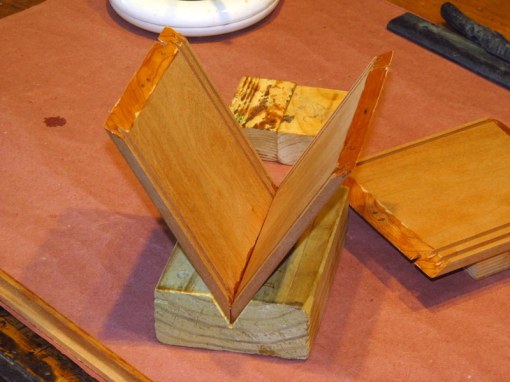
Dry fitting or gluing up something with many parts requires a third hand. This is the fixture I use to assemble triangular boxes. It is a bit of 2×4 with a deep 60 degree channel cut in the center.
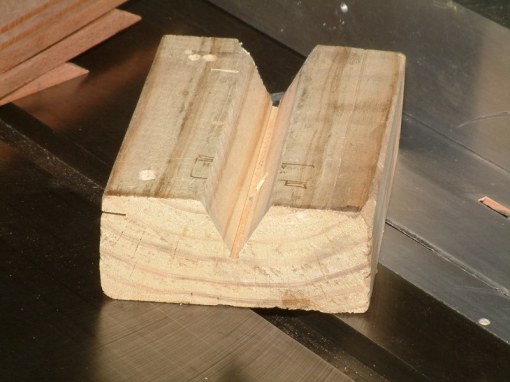
It is very effective holding the side plates together for a dry fit, and will be invaluable during the glue up. There’s a small amount of room at the apex of the V notch so glue won’t accumulate.
I also use this V block later against one jaw of the bench vise while planing top and bottom edges true.

I decided to pre-finish the lid plates. It’s always a problem wiping down pooled oil at the edge of the lid and the 60 degree corners of these boxes makes that even worse. I made a quick rack from scraps to support the parts while the Watco oil cures for a day or two.

I’m not going to cover my finishing process here, maybe that will be the subject of a future article. I’ll just point out the secret weapon – A small block covered with 1/16 sheet of wet/dry sandpaper. Wet the piece with oil and sand it in. Wipe it off not immediately but later when the oil has begun to congeal. Time the wiping right and you will have a baby smooth surface.

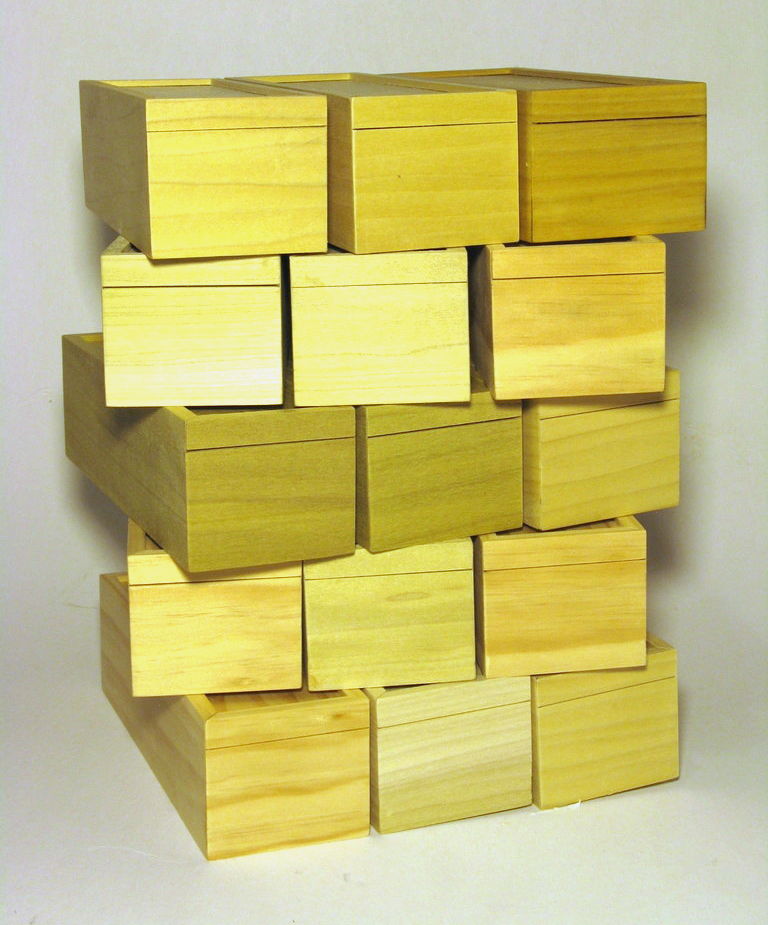
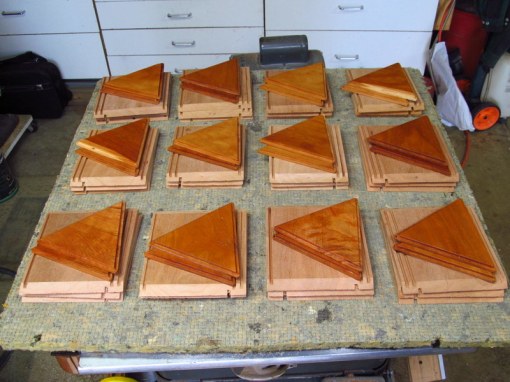
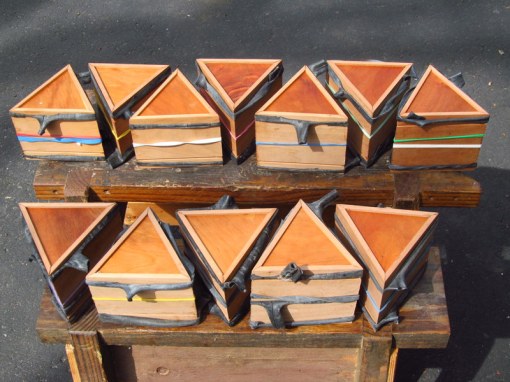
Using a series of jigs to construct parts helps when you are producing more than one item. You do one setup, run that on all the boxes, then move to the next setup. This run made twelve boxes.
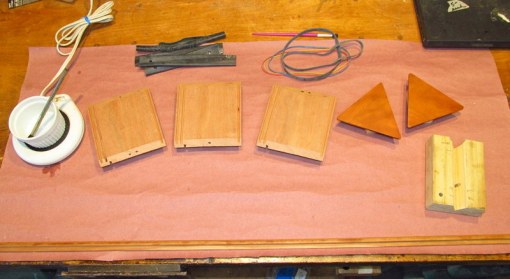
Everything for the 12 boxes is kitted up here, so on to gluing. I use Old Brown, liquid hide glue. I use OBG for it’s long open time, easy squeeze out cleanup with warm water, does not interfere with my Watco oil finish, and most important, if you get it on your shirt it will come out in the wash. It needs to be 120-140F degrees to work well and the work temperature should be above 60F. An electric tea pot preheats my bottle of OBG, then I squirt enough to do one box into a ceramic dish that’s warmed by a modified coffee cup warmer. It’s much more controllable to apply with a cut down acid brush than squirting it on from the bottle.
Glue ups should always be organized and rehearsed, the matching dots are critical. This was my working area. Red Rosin Paper protecting my beautiful plywood bench top. Small blocks of scrap keep the glue surfaces off the paper. Rubber bands and bicycle inner tube sections do the clamping.
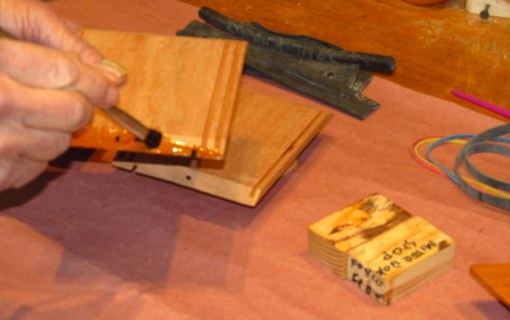
This is the only (poor) photo I got of the actual glue application. Paint a good bead across the bevel near the outside edge then draw the glue up to the inner edge. Make sure the area around the grooves is covered as the top will be weak if the glue is thin there. Try not to get it in the grooves themselves but it can be cleaned out later. Paint all six bevels.
Set two of the sides in the V block, paying attention to the dots. I’m usually putting the no dot faces in there but any pair will do.
Insert both lid plates, choosing the best one to be the top. I always grain align the top and bottom plates but that’s not necessary. This photo shows the top plate seated in it’s grooves.
Set the final side piece in place and slip a rubber band around the middle. I rock the box back in the V groove to do this. The rubber band will hold the box together while stretching stronger bands around the ends. Pinch the outside corners together all around, checking that the outside edges of the miters meet correctly.

I glued up all 12 boxes in about 2 hours including fussing with the Camera. Then set them all outside to warm in the sun.
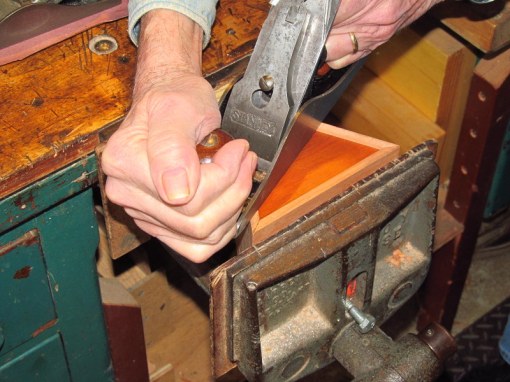
When the glue has set and the clamps removed, I true up both top and bottom edges. It usually takes only one or two strokes with a hand plane. This is a number 3, always use a long enough plane to rest the heel on an adjacent edge.
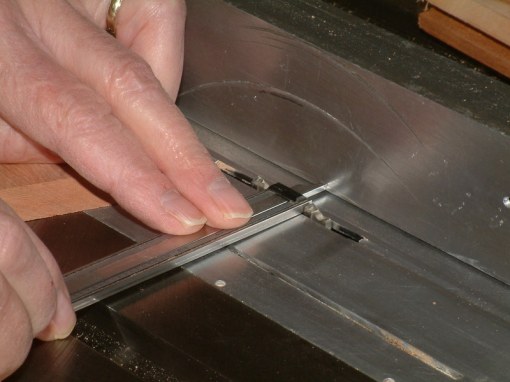
With a flat and true bottom edge to use as a reference, we can now saw the box top free from the body. Seat the box bottom firmly against the fence and tweak the fence so the saw blade leaves a tiny slice of wood above the groove. In the paragraph above on grooving, we allowed an extra 0.020″ width so leave about half of that.
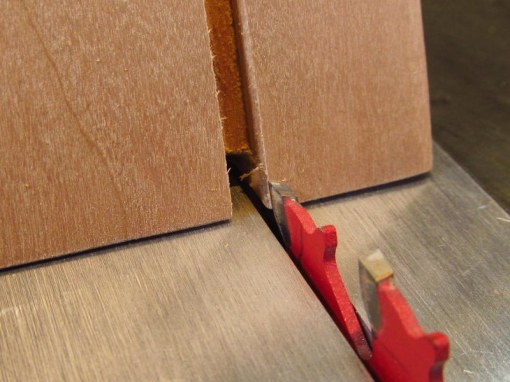
Proceed with the three cuts needed to free the lid. Do NOT press against the lid on the last pass, let the lid fall free else the lid will kick back and be damaged. Don’t Ask Me How I Know This.
Another way to handle the kick back problem is to adjust the blade low so it leaves 1/16″ of wood for support. Then finish the cut with a fine hand saw.

Because we allowed a little extra at the cut site, when the lid is separated there will be a thin strip of wood remaining on one or both pieces. Remove this with a hand plane, keeping the heel of the plane on an adjacent surface as reference.
Note the use of a second spacer block to keep the relatively narrow lid assembly under control.

Test fit the lid on the body. It is unlikely that it will fit perfectly. I purposely adjust the depth of the grooves so the lids are always too tight. That allows tuning with a shoulder plane at this point. Take thin shavings from the lip on all three sides of the body until the lid fits perfectly. I’m using a Miller Falls 85 here, it’s equivalent to a Stanley 78.

I’m not covering details of applying an oil finish here. I did two experiments with this run of boxes.
First I applied finish to the top and bottom lid plates before gluing up the box. That was because I could see wiping the oil down in those 60 degree points was going to be a pain. This mostly worked but I still got Watco on the lids so had to wipe them down anyway.
Second, I oiled the inside of the boxes separately with Formbys Tung Oil. It’s hard to wipe down the inside of the box with those sharp corners, and the Formbys sets up almost too fast. The inside came out OK but I notice in a few places, the Tung Oil got on the outside of the box and showed light spots later after applying the Watco Natural. Won’t be doing that again.
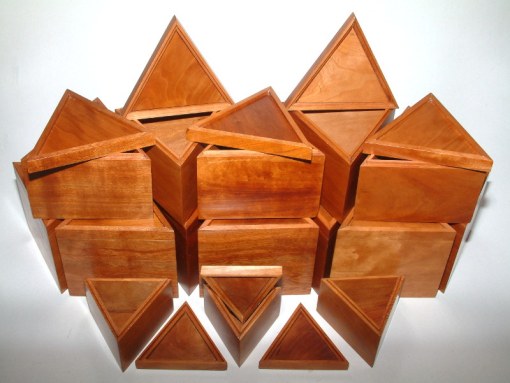
This is a family picture of the twelve mass produced boxes and the three prototypes. They came out well though I made a few mistakes along the way, resulting in some boxes being shorter than others. This is a novel design but too impractical to make a large quantity. Ted Baldwin, one of the Box Gurus on YouTube says you should never make something with corners so sharp you can’t get your finger in there to clean it out.