Frame and Panel Construction – Part 1: The Panel
These WordPress pages document my method of constructing a frame and raised panel door. I need to make a pair of these about 30″ x 18″ each to replace an ugly entrance to the crawl space in my home. Each door will be a single solid Pine panel, the frame will be about 2 inches wide with molding on the inside edge.
One episode of “The Woodwright’s Shop” contributed to my panel raising techniques. “Raising Panel-Zona” describes several methods, though my tools don’t match Roy’s.
I have a small panel raising plane. It is unusual in that it has an adjustable fence, there is no nicker and no flat area near the fence, the cut is beveled all the way to the edge of the work. It may have had some other use in the past but it works for panel raising. I have since added brass strips at the main wear points.


Making a cabinet door usually proceeds by constructing the outside frame to fit the target opening, then creating a panel to fit the frame. I have a number of frames made as practice exercises for a real job closing off the crawl space in my house. These were all based on square blanks cut from a length of 1×8 select pine from Home Depot. I used up all the spare lumber so for this weblog post I glued up some scraps and trimmed to 7 1/4 square.

Panel blank glued up and trimmed to size
The panel will have a quarter inch tenon all around the edges that seats inside a groove plowed around the inside edges of the frame. The first step is to define this tenon edge by measuring the frame face to groove distance so the panel will be flush with the frame. Subsequent operations will remove wood down to these lines. I darken the marked lines with pencil.

Mark the tenon edges on the panel blank
The panel raising plane fence has been set to an “about here looks right” distance from the cutter tip. I’m measuring this horizontal distance carefully, maintaining the angle of the bevel.

Measuring horizontal length of the bevel cut
I will be defining the inside line of the raised area using a cutting gauge. This is necessary, especially on the cross grain sides because the plane does not have a nicker. Here I transfer the measurement from the previous step to the gauge.
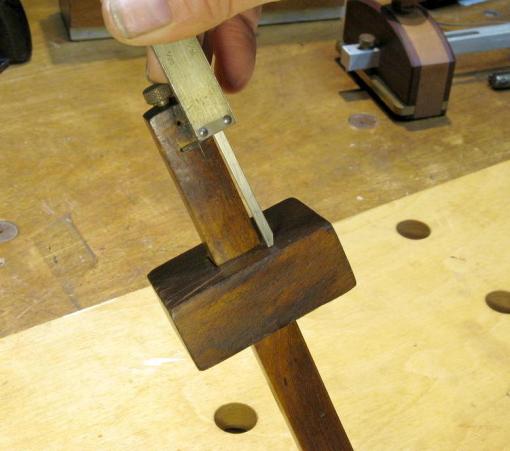
Transfer bevel dimension to cutting gauge
Cut the gauge lines deeply into all four sides of the panel blank.

Cutting bevel extent lines
Here I have darkened the lines with pencil.

Bevel lines darkened
One hand tool principle I have learned well is to remove as much material as you can with the blade that is easiest to sharpen. I block plane off wood down to about 1/16 inch from my two lines.

Removing waste wood
Now the panel raising plane does it’s work, starting with the cross grain edges. This plane works well across the grain because it has a steeply skewed blade. Which also means it is hard to sharpen.

Using the panel raising plane
Raising the center creates a shadow line which makes the panel look a bit smaller and lighter.

Panel showing shadow line
The final step is rabbiting the back of the panel to the line. This M-F 85 has the fence set to cut a quarter inch wide relief and the depth stop set to stop at my line. Since the raised portion of the panel is angled, the edge tenon is tapered so I will make this a little less than a quarter inch thick to make it easier to fit the frame groove.
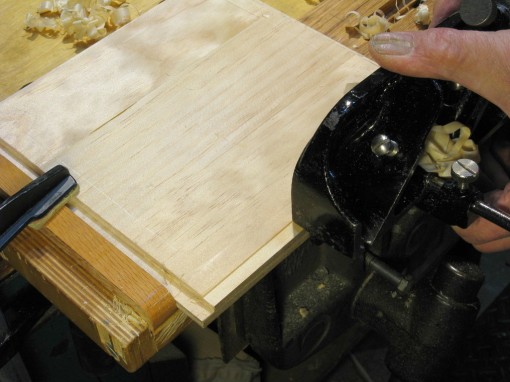
Rabbiting the back side
The finished panel came out fairly well though I had trouble with the panel raising plane. I believe the blade is not bedding flat inside the body which causes the blade to flex slightly and chatter. The wedge also loosens too easily which causes the blade to fall out. I’m working on it.

Finished panel
And it does fit the frame. See how all those shadow lines make the panel look like something other than a flat board.

Finished panel fitted in frame

No trackbacks yet.